Quantcast
Channel: Hammers and High Heels
Viewing all 231 articles
Browse latest View live

A New Look For Hammers & High Heels

$
0
0
It felt like it might be time to do some updating around here...
Who doesn't love a good makeover montage?
I had been itching to change up the look of Hammers and High Heels for a LONG time now and I am so excited to finally see it all happen!  I know it takes some getting used to, but I hope you are digging the fresh look too!

I have to give my silly (and necessary) Hammers and High Fives to local designer Kayd Roy for developing the new concept, logos, layout, color, and everything really... oh and for putting up with me after a few rounds of revision requests, I know I can be picky and crazy :)  I wasn't totally sure where to start, or what I wanted to change, or how I wanted it to look, I just knew it needed a new look.  I'm still amazed that she zeroed in on what I wanted even when I couldn't describe or show her what exactly what it was, LOL!  Thank you again Kayd!!!   

We might be working out any weird formatting/font/layout issues for the next couple days, so be patient if you see anything funny in the meantime! 

What do you think of the blog makeover?

I will have an update on the Vestibule tomorrow, I meant to get that up sooner but I was way too excited about the new look being launched! See you then!

A Salvaged Light Fixture, Decorative Molding, and New Paint for the Vestibule!

$
0
0
My Vestibule project is so much better this week!

I found these salvaged light fixture at Bauer Brothers Salvage over the weekend, they're strangely awesome right?  I thought the distressed copper metal would compliment the color of the tile work in the entryway well and I loved the unique vintage look. With the way it is designed, light will be able to come out from all sides which should help brighten up the little space too!  The best part was talking the price down from $75 to $50 and taking one of them home!  Not too bad right?

In addition to the light fixture, I picked up one of these decorative moldings from Menards for around $10.  I loved the suggestions posted in our comments (in this earlier post) to add some kind of interest to the ceiling since it is such a small space.  I thought we would paint this to match the wall color and give the ceiling a little pizazz!

As for that awful navy blue paint, I kissed it goodbye and covered it up with a couple coats of Behr's Bitter Chocolate paint.  It is the same color we used in our Master Bedroom, and actually Alex suggested this before I made the mistake of trying navy blue... so here's an official "honey you were right" for all to see :)
Haha!  It looks way better right?!?  Even has a nice shine too it like I had wanted!

We Alex will be installing the light fixture tonight.  Fingers crossed our salvaged find is in proper working condition and we won't have any strange electrical issues!  Then just a few finishing touches and we should be able to finally post some 'afters'!

What do you think of the vintage light fixtures?

Do you like the new paint?

Head Over Heels DIY Friday: Monogrammed Table Runner

$
0
0
Can you believe Thanksgiving is less than a week away?!?  Naturally, this week's DIY had to focus around some table decor! Take a look at the simple and stylish monogrammed table runner I made last night...
All it took to make it was a solid table runner (I used the reverse side of one I had at home), fabric paint, paint brush, and a stencil (or two) for the design. We had a metal "Z" stencil that I actually use for decor, but it worked perfectly to make our monogrammed Z. I printed and cut out a greek wreath pattern to use as a stencil around the Z.
I traced the stencils using a pencil and then filled in the design with gray fabric paint.  Super simple right?  
I still have to figure out my whole Thanksgiving tablescape, but I know I will be using this table runner to give our table a personalized "Z" family touch! 

Are you Head Over Heels for my DIY monogrammed table runner idea too?


Click here to see last week's Thanksgiving DIY wall art too if you missed it!

Tomorrow morning we'll be fighting the crowds at the grocery store for our turkey and other necessary Thanksgiving food goodies.  Are any of you going to be grocery shopping too?  I have to admit I am kind of scared :)  it's always a crazy crowd right?

An Entryway to Make an Entrance! Check Out Our Updated Vestibule

$
0
0
Checking a project off the list, ahhhh love that feeling! Time to show you our finished Vestibule update!
Alex and I hatched the idea for this redo back in April when I read a Houzz article about "Vestibules from times past transitioning into entryways of the present".  The article made me realize our itty-bitty entryway space had architectural history, charm, and had the potential to be so much more- it was a Vestibule!  So we had to take it from entryway to a place to make an entrance!

From there we didn't have a whole lot to do but things got derailed when then this awful, awful cookie monster blue mistake happened (and yes I admit that was my fault, such a poor choice!).

Thankfully, we were able to recover from that low point by repainting and adding a few decorative accessories.  Once we installed the light fixture, decorative molding, and wall hooks our Vestibule finally had a finished look! 
Now, I can't think of a better way to show you the changes than letting you enter through the front door yourself! Oh, and yes Rocco and Sadie always promptly greet guests so you get that for free too :)
The main changes were the beadboard trim, new paint- Behr's Bitter Chocolate, new light fixture (found at Bauer Brothers Salvage), the decorative molding around the light fixture base, and wall hooks.
I realize you might be surprised that we didn't add any decor to the walls, but when we tried out a mirror or photos it just looked crowded.  Since it is such a tiny space I decided that less stuff would be the best way to go and if guests have an extra spot to hang coats then that is awesome!

I think my favorite part of the whole redo was adding the salvaged light fixture with the painted molding around it.  Since we didn't have space to decorate much I think it is fun that we decorated the ceiling!  I also love that the light fixture hangs and allows light to shine from the top, bottom, and all sides.  It totally brightens up the space and the antique copper metal compliments our tile work nicely! 
I'm so glad we were able to finish it up just before our out of town guests arrive for Thanksgiving!  I wonder if they will notice the change since last year, hmmmm?!?

What do you think of the updated look in the Vestibule?

Thanksgiving Traditions to Be Thankful For

$
0
0
Alex and I are feeling very thankful today that our home is warm, cozy, and filled with family.
It is our fourth year hosting Thanksgiving for our sister, brother-in law, and nephew so it's feeling more like a tradition for us now. 

Alex has his groove down when it comes to cooking most of our delicious meal while I have fun setting up a few decorations in between assisting in the kitchen.  We all watch football, play a few games, and know we can always count on catching Sadie sneaking around in hopes of stealing some of our dinner.
Caught in the act!!! 

That's kind of how it goes around here and I love every minute of it!  The day fills my heart with joy and I can't wait to have a tummy full of yummy food shortly (as long as Sadie doesn't get to it first, LOL)!

We hope you and yours have a wonderful Thanksgiving! 

Head Over Heels DIY Friday: Auntie Carla's Mohawk Cuts

$
0
0
Our nephew Henri had a "Best Day Ever!" type of day.  It started with an OVERLOAD of fun at the Mall of America....
Seriously, can't you FEEL the excitement in that smile?!?!
.... And ended with a fun new hairdo courtesy of my DIY skills :)  Yes, today called for a very special edition of my DIY Friday series because it involves a skill I haven't shared before.... Mohawk haircuts. 

I know it is random, but I am very skilled at doing some buzzed mohawk haircuts.  I'm not totally sure when I started doing them, but I've been doing them a lot more often lately since Alex prefers a mohawk during his cycling race season.  Today, our nephew Henri decided he wanted a mohawk too since Uncle Alex had one.  Auntie was happy to DIY his new 'do.
 Henri's new look is so Todd Mod  right?!?!  Especially with the Teenage Mutant Ninja Turtle facepaint :) 
(Todd Mod =Toddler Modern, I usually hate shortened words but it's too perfect for Henri's look!)


I know this is out of my normal DIY home related posts, but with family in town I certainly haven't been working on anything around the house (besides, this is just too fun and cute not to share)!


What do you think of Henri's fun new 'do?  Are you Head Over Heels too?!?

How did you spend Black Friday?  Did you shop?  Or did you hide?!?

Kaboom!

$
0
0
With Thanksgiving behind us it was time to dig out the Christmas decorations from the basement.... Which only means one thing- an EXPLOSION of Christmas is about to happen in our house.
With any kind of explosion there's going to casualties and when it comes to Christmas decor the casualty is usually my sanity.   I LOVE decorating our house for Christmas but sometimes I can go a little cuckoo-bananas-crazy about every little detail :)  I hoping I can keep things under control this year and just enjoy each little tradition of holiday decorating!  Speaking of, we will be making our annual "Griswold Style" Tree Adventure next weekend!  I can't wait to have a tree to decorate!!! Eeeeek!!!

So how about you? 

Are you starting to decorate for the holidays too?

Do you go a little nuts when it comes to decorating too?

Do you have a theme for this year's holiday decorations?  What is it?

My $3.00 Chair Gets a Modern Meets Vintage Restyle!

$
0
0
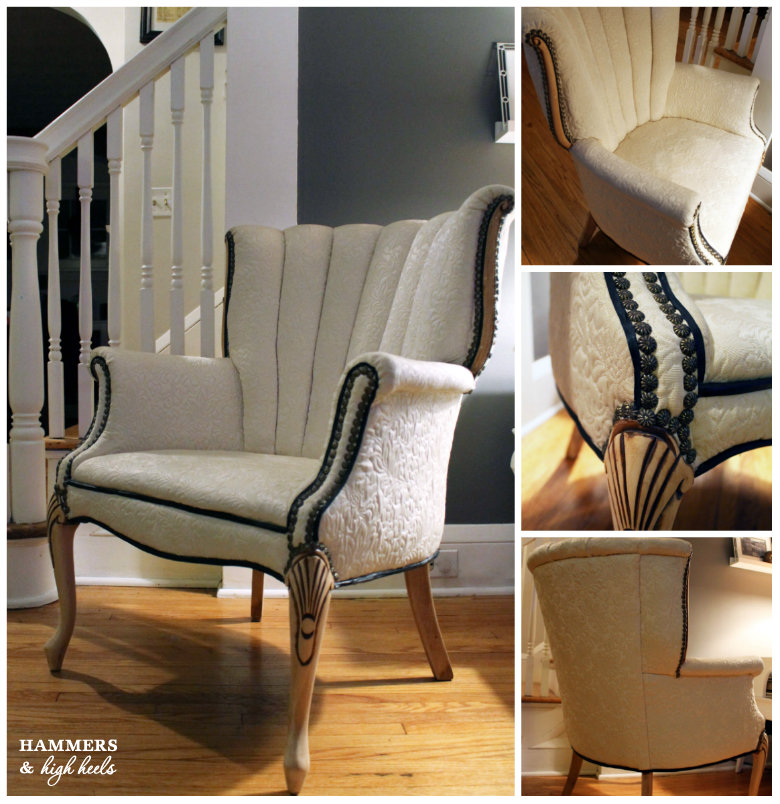
Remember that fantastic antique chair I found for just $3.00?   Well, I got my little redo on it finished up last night!  Here's the exciting 'before' and 'after' action!
When it came to making a decision on an updated look for the chair, I looked back on all the ideas I liked.  The chair was in great shape as is (even that white fabric, isn't that crazy?!?), but I had to make it a little less "from Grandma's house" looking in order to enjoy it in our house.  Additionally, I didn't want to make any huge change that could damage or ruin the chair.  After all it is a nice antique find! 

So, I landed on creating an updated look similar to the two chairs shown in the top right and center in the group below...
Images via One Kings Lane
Which in a nutshell meant making two changes...

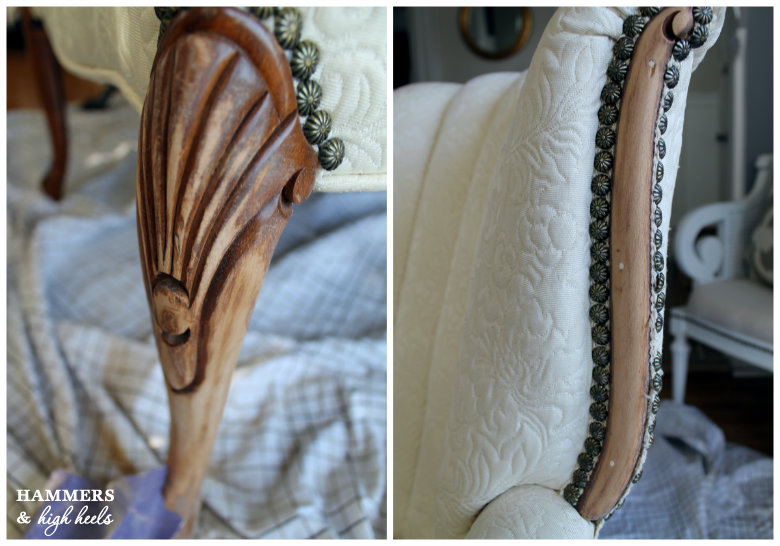
First was the wood.  I sanded off the dark stain to expose a lighter toned/raw wood look.  Then we did a light stain and seal on the wood surfaces.
Second, updating the color of the piping.  I wanted the piping to be a faux black leather which seemed like it could be easy, but like most of my projects it wasn't.   I didn't want to tear off the existing self fabric/piping cording (in the spirit of not destroying or altering the antique permanently) so my idea was to cover it.  Here's how I went about it...
I found the faux leather ribbon/cording cover at JoAnne's and used a round upholstery needle to stitch it around the corded piping. 

Let me tell you, it is pretty dang hard to stitch through upholstery cording! I had to use leather gloves or my fingers would have started bleeding!
It might have been a big pain to do it that way, but at least I know I can remove the faux leather ribbon/trim someday if I get tired of the look and the chair will look just as it did before.

Once again, here is the 'before' and 'after' look!
It's a less 'from grandma's house' look right?!?!  I'm loving the black/white contrast now!  I think the freshened up wood and faux leather trim give it a modern meets vintage kind of look. 
Right now it is in a corner of our Living Room, but once I finish up my Dressing Room/Closet I think this chair will add the perfect glamorous touch for my fashionable space!

What do you think of the chair update?

What kind of decorative pillow do you think would look nice with the chair?

Linking this up!

Head Over Heels DIY Friday: Wood + Yarn Advent Calendar Plus Freebie!

$
0
0
Happy Friday!  This week's DIY is this fun wood and yarn Advent Calendar Creation!
Here's what you'll need: Wood board (mine was 15" x 19"), yarn, scissors, sewing thread, and small nails.
Start by marking the position for your nails and hammer them in.  I made mine in a triangular tree shape with two smaller trees inside.  Once your nails are in place, start wrapping the yarn around each nail to make your shape.  Make sure to pull it very tight and tie a knot close to one of the nails so it is a little hidden.
Then, do the same thing with the sewing thread but go around the shape twice pulling it VERY tight.  The yarn and thread will help hold onto your advent numbers (you'll see when we get to that step).
You will do those steps two more times, or as many as needed depending on the size you want.
 The last step is adding in your numbers!  I made some numbers with fun frames and printed them out on cardstock paper.  I included those numbers as a FREEBIE at the end of this post :)
 Then you're decorative Christmas countdown is complete!
Pretty easy right?  Here's that FREEBIE if you'd like, just click to open it, print and cut out the numbers for your advent calendar.  Again, it will work best if you print them on cardstock paper.
Are you Head Over Heels for this DIY too?

What did you think of my DIY Advent Calendar? 
Are you going to make or use an Advent Calendar this Christmas in your decor?

Have a great weekend everybody!  Alex and I are cutting down our Christmas tree tomorrow! Eeeeek! I can't wait to decorate!

A Very Dark "Griswold" Style Christmas Tree Adventure

$
0
0
I realize the photo below is very blurry so if you can't tell, it is Alex with a VERY grumpy face carrying our freshly cut Christmas tree on his back, in the dark, with a Santa hat on.  Oh, and I am driving along side of him, hence the blurry picture. 

Yes, we got our Christmas tree last night!  But note the key word *night* which made our typical "Griswold" style tree cutting adventure pretty complicated... 


So in order to tell this story I had to start with THAT photo, but let's back up to earlier in the day.  We set out around 3:30pm to get a tree which was much later than when we went in 2010 or 2011.  Alex had to attend a cyclocross race earlier in the day and I had a lot of other projects I was trying to finish up.  We knew we would be cutting it close for daylight time but we figured we'd be alright.

We arrived at Rum River tree farm just before 4:30, which was their closing time (we know why now). We wasted a little bit of time taking goofy photos since that has been a part of this tradition of ours.  We've always compared our Tree cutting adventure to the Griswold's from National Lampoon's Christmas vacation, Alex thought he'd just do his best Clark Griswold impression...
Ahhhh my very own "Sparky"!

I couldn't come up with a character so I just did the red & white thing with some wedge heel boots of course- and yea that wasn't the best idea.  I tried my best to not break an ankle or fall over on the saw blade which lead to Alex's favorite photo of the day....

Pretty good stupid face right???  Anyway, it must have been around that moment when our fun adventure went a bit south.

Since we've had a pretty dry year lots of the trees were brown and icky.  We circled around the entire tree farm in search of a nice tall tree as the sun started to go down.

It had to be minutes after the sun disappeared that we found our tree which ended up being a Colorado Blue Spruce.  Feeling pressed for time, Alex gave a nice crazy face fitting of Clark W. Griswold and began cutting down our tree.
As you might imagine, cutting a tree down in the dark isn't easy.  Alex and I couldn't really see much at all other than when I took a picture with a flash.  I was pretty pumped when I found that I captured these funny faces on Alex, hehe!
Anyway, after about 5 minutes of Alex saying, "I can't see what I'm sawing, is the tree wobbling yet? It's so prickly under here, is it tipping over yet?" , the tree finally tipped over THANK GOODNESS! 

Once we dragged the tree over to the car we found that we had a new problem- we had no way of getting it up to the front of the tree farm.  Usually we have a bike rack on top of our car that a tree could balance on until getting it baled but Alex had taken it off a couple weeks earlier.  We tried to balance it on the trunk and even in the trunk but no luck(remember we were able to bring a tree to plant home in our trunk before).
So, out in the dark and in the middle of a big ol' tree farm, Alex hoisted the prickly tree on his back and shoulders and walked it up to the front.  I drove behind and along side him as he walked to give him some light... and take a couple photos (which all ended up blurry).  The distance ended up being around 500 yards.  Boy OH boy was Alex grumpy when he finally reached the baling station. 

In the end, our tree adventure wasn't as fun as it had been before but we made it home with our tree!!!!
I can't wait to decorate it!!! 

I've been finishing up a few other projects (that I will share tomorrow) so it has been a tease having a undecorated tree in our living room today.  I hope to get started on it soon so I can share our 2012 Christmas tree!!!!  (click here to see our 2011 tree)

How about you?  Is your tree decorated?  Did you cut one down "Griswold Style" too?

Handmade Hammers & High Heels Creations for Sale at Finch's Holiday Boutique!

$
0
0
As I mentioned yesterday, I have been busy working on a little side project and that project was for Finch's Holiday Boutique!!!  I wasn't able to make as many items as I did for last year's boutique, but I'm still happy to have a few goodies up for sale!

Here's some info about Finch's Holiday Time Boutique...
Finch's Holiday Time Boutique features unique items from over 50 artists & designers, just in time for the holidays!  (and sorry to the long distance readers, this one is local here in Minneapolis).  This Handmade Open House is Saturday, December 8th from 11am-5pm, and Sunday, December 9th from 12pm-5pm. Check out Finch's Boutique Blog for all the event details, location, and get a sneak peek at what will be up for sale! It really is a talented group of people with lots of incredible creations! Special thanks to friend (and fellow home & craft blogger ) Elisa for organizing the event!

This year I decided to focus on one product type- Decorative Pillows!  I used some plaids and felted wool fabrics to create pillows that had a cozy, winter-y touch!  I figured if they'd make shoppers think about cozying up at home (and hopefully purchase for their home!).  Here's a look at the fun pillows that will be for sale at the boutique!
Red Felted Wood Decorative Pillows with Jingle Bells: $18.00 each

Oversized & Stuffed Menswear Plaid Decorative Pillows or Floor Cushions: $20.00 each

Key Printed Burlap Decorative Pillows: $15.00 each
Like I said, not a whole lot but I know these pillows will add a cute cozy touch to anyone's home this Holiday season!

If you are local here in the Twin Cities make sure to check out the Boutique!  Hope to see you there!

Our Rustic 2012 Holiday Mantel

$
0
0
Are you feeling the Christmas spirit yet?  I know we are now that our house covered in Christmas and I am excited to start sharing pictures of the decor!  Let's kick things off with our 2012 Holiday Mantel!
This year we decided to go with decor that felt cozy & rustic, sort of the feel you'd get from spending Christmas in a cabin up north. 
We used birch wood branches & logs, antlers, lanterns, pine branches, snowflake garland, and a few bronze & red glass ornaments.

 I love the cozy look and feel!

(Click here if you'd like to see our 2011 "Merry Little Vintage" Mantel or here to see our 2010 Christmas Mantel.)

What do you think of our 2012 mantel?

How did you decorate your mantel this year?

I'll have a lot more to share of our Christmas decor including our staircase, sideboard, a DIY here-and-there, and of course OUR 2012 CHRISTMAS TREE!!!!  Hope you'll stop back to see!

Linking this post up over at The Lettered Cottage Mantel Party!

All Warm & Cozy By Our 2012 Christmas Tree!

$
0
0
There's something about a beautifully lit Christmas Tree that makes you feel all warm and fuzzy inside, right?  We finished up decorating the tree we picked up on our annual Griswold adventure (that post is a must see!) and I'm feeling all warm and fuzzy looking at these pictures! 

I'm hoping you'll enjoy a look too!  Here's our 2012 Christmas Tree...
We decided to put the tree in our Living Room instead of the Sunroom like last year.  

 We kept with our cozy rustic cabin theme for our tree as we did for the mantel decor (click here for a look at the mantel!).
I used plaid garland with only red, gray & clear glass ornaments. I stayed away from any gold, silver, or glittery elements to keep a rustic vibe which was actually kind of tough!  Everything is covered in glitter this time of year, right?!?
My favorite ornaments on the tree are the glass ones filled with cut book pages inside!  I picked some up last year at Finch's Boutique created by Jason Berke and still love them! 
I also think that I finally mastered the art of winding the garland throughout the tree opposed to wrapping it around. It really makes such a difference!


*Sigh* I just love the warm cozy feeling of a Christmas Tree in our home and I love decorating it with my hubby each year!

Click here to see our 2011 Christmas Tree AND each one before(we've really improved our tree decorating since our first in 2007, LOL)!

What do you think of our 2012 Christmas Tree?

Do you have any tree decorating secrets/skills to share?

Head Over Heels DIY Friday: Good Finds & Good Times at Finch's Holiday Boutique!

$
0
0
I know it's late tonight but I went to the preview sale at Finch's Holiday Boutique and have plenty of eye candy to share!  It was a blast shopping all the goodies while enjoying yummy food and drinks with the fabulous hostess herself, Elisa!
Rosey cheeks + flared nostrils = giggles & good times :)

For all you local folks that can stop by and shop the goods here's a sneak peek at all the handmade & DIY goodies that will be on sale tomorrow...
This year Elisa also included a special Children's & Pet's section at the boutique. The cute-ness is insane!!!
Naturally I was Head Over Heels for just about everything, but here's the loot I just had to take home! 
As I type, I'm waiting for those homemade pickles to get cold, I LOVE pickles!  Ugh, and how fabulous is that vintage feather necklace?!?!  I can't wait to sport it!  I know Alex is anxious to try those Firestarters (I swear, the guy has a weird obsession with fire).  Other items shown I can't share further details about :)  It's Christmas ya know?!?!

Like I said, I am Head Over Heels for Finch's Holiday Time Boutique! 

Elisa, I don't know how you do it all but girl you do it well :)

If you are in the Twin Cities this weekend be sure to stop by Finch's Holiday Boutique this weekend only and pick up some great one of a kind gifts!!!  Check out all the info here!  If you get there tomorrow at opening you will get to see the fun ribbon cutting too!

A Winter Storm Wonderland

$
0
0
We woke up to metric-crap-ton of snow today and it just keeps on coming down.  Even though I know this much snow is going to be a pain in the buns when it comes to getting around town, I have to admit that I'm loving it because it feels like Christmas!!!!  Last year we barely got any snow at all and the year before we were buried from November until March in nearly three feet of the the stuff.  So yes I love it now, I just hope the snow stays around at a cute level and not a nuisance level :)

Speaking of not getting a lot of snow last year, the kiddos seems really surprised by the big puffy piles of snow today since they really didn't see it at all last year.

It took Sadie a minute to set foot in it (it's her third winter) but then it was like she'd been shot out of a cannon!  She just loved bounding through the snow!
Sadie sure loved it but our other little guy Rocco... not so much.  You can see that he pretty much stood in place as Sadie ran laps around him (notice the arrow pointing at Sadie running by in a blur).
I guess Rocco prefers this kind of stroll in the snow.  Works for me since he hates being held otherwise, ha!
The National Weather Service said that we should expect 8-12 inches of snow to stick around and some totals could be up to 16 inches!  Yikes!
For now I am just going to appreciate the beauty of it, tomorrow might be another story :)

If you are local, what do you think of the snow?  Love it?  Hate it?

Anyone else play in the snow today???

A Message for Santa Along Our Staircase

$
0
0
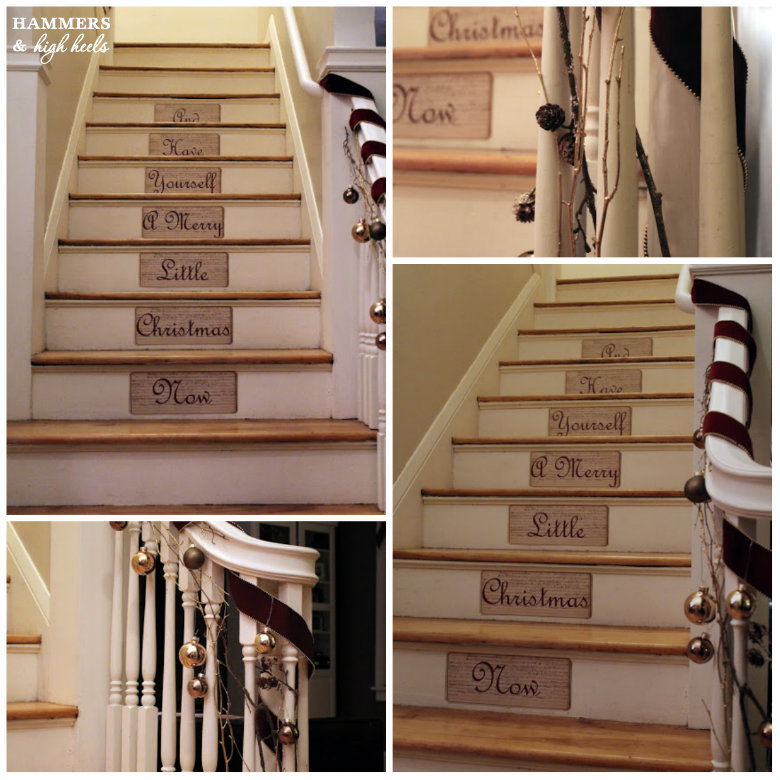
Last Christmas, one of my favorite home decorations was the "Merry Message Along Our Staircase".  So naturally, I had to do version 2.0 this year!  Take a look....
Don't you love that Rocco snuck into that photo?  Total photo bomb :)
I used "the stockings were hung by the chimney with care, in hopes that Santa Claus would soon be there," for this year's message.  I followed the same steps to create the decorations as last year, but in case you want a quick version...
  • Select a message for your staircase and count out the number of steps you will need signs for
  • Measure the size you would like your signs to be for your home's stair riser (our signs are 12.5" x 5.0")
  • Print out the signs for each stair riser on cardstock paper
  • Adhere the signs to each riser centered as desired (we used 3M Command Adhesive Poster Strips opposed to regular tape to make sure they would stay in place and not ruin the paint when it's time to remove them).
It's a pretty simple project and I love that our staircase is part of the holiday fun now!
 Here's a look at last year's if you are curious :)


I think all I have left to share is our Holiday Dining Room Decor! Hope you'll swing by again to see that too!
Click here if you'd like to see our 2012 Christmas Tree or Christmas Mantel!

What do you think of our Holiday staircase decor?  Would Santa approve?!?
Have you decorated your stairs or banister?

Linking this post up over at Southern Hospitality's Christmas Vignette Linky Party!

Warm & Welcoming Holiday Dining Decor...

$
0
0
The holiday season is still feeling warm, rustic, and cozy at home here for Alex, Rocco, Sadie & yours truly!   Here's a simple look at our table & dining room decor!


Pretty, cozy, and fitting for a comfortable night at home to celebrate the season!

What other simple ways do you make you dining room ready for the holidays?
Do you have fun cute ways to display food for company on the holidays? Let us know! 

Happy Holidays and thank you for visiting us! We wish you and you family a warm & wonderful holiday season!

Head Over Heels DIY Friday: Five Handmade Gift Ideas

$
0
0
Hooray for Friday!!!  I don't know about you but between getting ready for Christmas and a few back to back busy work days, I am absolutely pooped!  And when I'm pooped I have a really hard time being creative... so sadly I don't have a new DIY this week.  Instead, I thought I'd share 5 DIY gift ideas that have been featured here on Hammers and High Heels.  Just click the links to see the tutorials!

First up.... a Holiday Themed Chalkboard, Personalized Family Name & Established Sign, and Holiday Linen Stripe Stockings.
 Next (and still one of our most popular posts) is my Multi-Wear Snap Scarf
And the #5 DIY idea are these oh-so-fun and stylish Tassels, they are easy to make and perfect for accessorizing an outfit or as a home decor accent!


And if none of those gift ideas help you out with your gifting list....

 A sleepy-eyed puppy under your Christmas tree is always a winner :)  Who wouldn't like that?!?! 
I couldn't help it, had to share his silly cute photo.  But hey, I guess Rocco is pooped lately too? 

I hope you got some inspiration from one of those DIY ideas... or at least felt Head Over Heels for Rocco!
I hope to recharge this weekend so I can have some creative energy for the upcoming week! 

How about you? 
Have you finished your gift shopping?
How do you balance crazy busy days leading up to the Christmas?

Now, I going to enjoy my Friday night... on the couch... like a bum... but it sounds fantastic :)

"I Want Moose Antlers"

$
0
0
My husband is strangely obsessed with something new this week- Antlers.  Moose antlers to be exact and Alex is determined to make his very own set of paper mache moose antlers.

Boy-oh-boy

Paper mache has never looked so manly, right?  It's paper macho now, ha! Okay sorry that was lame.
Anyway, I'm not sure when exactly but this all started when I mentioned liking the paper mache animal sculptures West Elm had online and suggested we try to make our own.  
Image via West Elm
Apparently Alex thought that I was challenging him to a paper macho mache antler contest or something because he couldn't stop asking about it!  Seriously, I think I heard the following questions each day for a whole week....

"When are we going to make those antlers?"
"Did you pick up extra newspapers for the paper mache antlers?"
"Do we have wire hangers we can use for those antlers?" 
"Should we get metal wire from Home Depot to make those moose antlers?"
"I can't find any masking tape, do we have any for making the antlers?" 
"Should get extra masking tape today so we won't run out when we make the antlers?"

It was so strange... and yes annoying.  Alex couldn't seem to drop the silly moose antler idea!!!  He even searched online and found some hand-sculpted paper mache moose antlers on Etsy for $900....
Image via Etsy
... which only seemed to offend him.  I am sure the $900 Etsy antlers are very fancy, but I guess Alex couldn't get past the fact that they weren't real antlers and they were made of Elmer's glue and paper.... they only furthered his determination to make his own super fancy-pants moose antlers (still made of paper and glue). 

Anyway, it has been kind of fun watching his creation take shape since I have been lazy in the DIY department lately.  I've also never paper mached anything, so it's kind of interesting... and messy.    

Here's to hoping I don't have to get glue out of his hair later... or have to go to the store for more masking tape.  Ugh masking tape.

We'll show you how they turn out once he is finished!  
Have you made paper mache antlers? Or any other paper mache decor creation? 

PS- I informed Alex I was writing this post and he shamefully laughed at his quotes- because it was so TRUE!!!!  Haha!

Head Over Heels DIY Friday: My Thrifty $40 Hutch Barmoire Update!

$
0
0
I can't believe Christmas is in four days!  Are you feeling ready?!?!  Another thing I can't believe...

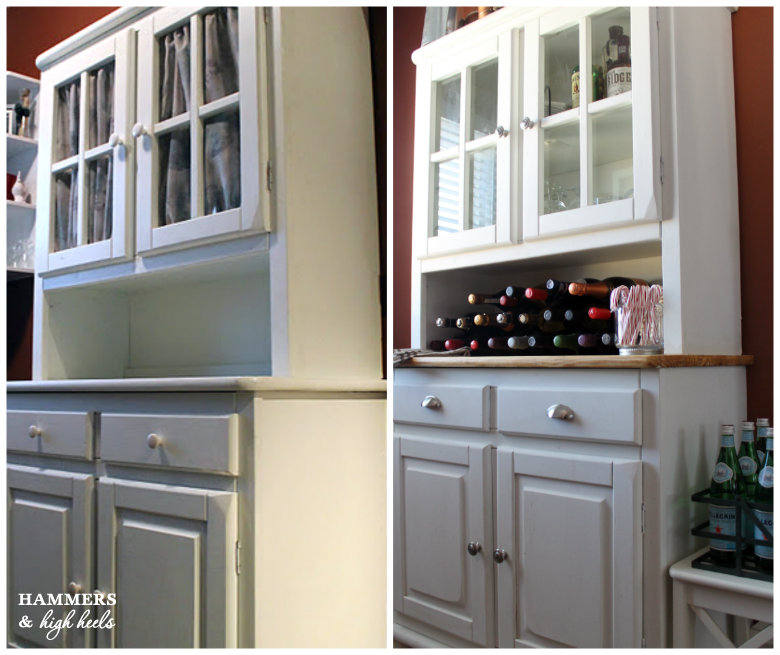
It has been almost a WHOLE YEAR since I last talked about the $40 hutch I scored at a local thrift store for our kitchen nook.  So, this is a very exciting DIY Friday!  Take a look at my transformation from bland hutch to classic-chic (and purposeful) barmoire!

I got the "barmoire" idea from a few photos I kept seeing in Pottery Barn catalogs.  They would use barware in photos of their hutches and I loved the idea!  Who doesn't need a spot for barware and spirits?
Image via Pottery Barn
The whole reason I bought the hutch was to add extra storage for our kitchen and instead of stashing random stuff in it I thought it be more purposeful (and fun) to take it from hutch to barmoire!  In order to create a barmoire look out of our $40 hutch, I had to make a few upgrades. 

First, I ripped out those icky curtains on the upper cabinet doors and replaced them with glass from North End Hardware.  They can cut glass to size on the spot and the new glass only cost $12.64!

After adding in the glass, I replaced the old cabinet hardware with new pewter metal hardware from Home Depot.  I also ended up touching up a bit of the white paint on the sides and doors where it looked a bit roughed up.

Last and certainly not least is the change to the tabletop on the hutch.  Do you see all of that white paint on there?  Well, after Alex helped me remove the top portion of the hutch (the top cabinets are not attached to the base) I took out our belt sander and tore into all that paint until I reached the natural wood surface...

... Let me tell you, that part was not fun.  It was a solid two hours of sanding until I could barely move my arms or shoulders, oh and I was covered in a cloud of paint dust.  It was crappy and gross- BUT- once I took a look at the beautifully patterned natural wood texture that I had uncovered it became worth all the hard work! 


I think sanding and refinishing the wood tabletop had the BIGGEST impact on the updated look of the hutch. It gave it more detail, dimension, and elevated the overall look of my $40 find!!!

I guess I have to admit, for a while I thought I wasted $40 since it wasn't feeling special or like it belonged in our kitchen- but since the update, I can't imagine our kitchen without it!

What do you think of my $40 find turned barmoire?  Are you Head Over Heels for this DIY?

Happy Holidays and have a wonderful weekend!  For those traveling to be with family or friends we wish you a safe trip!
Viewing all 231 articles
Browse latest View live


Latest Images